Today we provide you full tutorial about how to add Multi-Tabbed Widget For Blogger. This is another important blogger widget for those blogger who can show all tab in one widget means recent post widget, popular post widget and comments widget in one widget. If you installed multiple tabs widget than you should not installed any more widget for recent post, popular post and recent comments. It also decreases loading time of your blogger blog by combining all widgets in one widget.
Add Multi-Tabbed Widget For Blogger
You need to follow below steps to add Multi-Tabbed Widget For Blogger:
Step 1
Go to Blogger Dashboard.
Step 2
Go to Layout and Click on Add A Gadget as shown in below picture.
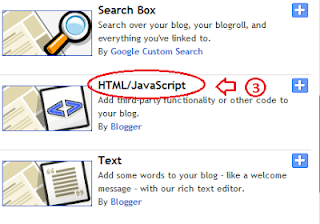
Step 3
Add HTML/JavaScripts as shown in below picture.
Step 4
Copy and Paste below code in box:
<script type='text/javascript'>Tips: 1. Change your background colours with change #FFFFFF with your background colours.
//<![CDATA[
function haakblog_oom(NBTID, id)
{
var haakblog = document.getElementById(NBTID);
var NBTs = haakblog.firstChild;
while (NBTs.className != "NBTs" ) NBTs = NBTs.nextSibling;
var NBT = NBTs.firstChild;
var i = 0;
do
{
if (NBT.tagName == "A")
{
i++;
NBT.href = "javascript:haakblog_ubah('"+NBTID+"', "+i+");";
NBT.className = (i == id) ? "Active" : "";
NBT.blur();
}
}
while (NBT = NBT.nextSibling);
var Halamans = haakblog.firstChild;
while (Halamans.className != 'Halamans') Halamans = Halamans.nextSibling;
var Halaman = Halamans.firstChild;
var i = 0;
do
{
if (Halaman.className == 'Halaman')
{
i++;
if (Halamans.offsetHeight) Halaman.style.height = (Halamans.offsetHeight-2)+"px";
Halaman.style.overflow = "auto";
Halaman.style.display = (i == id) ? 'block' : 'none';
}
}
while (Halaman = Halaman.nextSibling);
}
function haakblog_ubah(NBTID, id) { haakblog_oom(NBTID, id);
}
function haakblog_inisial(NBTID) { haakblog_oom(NBTID, 1);
document.write('');}
//]]>
</script>
<style>
div.haakblog div.NBTs {
height: 24px;
overflow: hidden;
}
div.haakblog div.NBTs a:hover, div.haakblog div.NBTs a.Active {
background-color: #eee;
}
div.haakblog div.Halamans {
clear: both;
border: 2px solid #f4f4f4;
overflow: hidden;
background-color: #ffffff;
}
div.haakblog div.Halamans div.Halaman {
height: 100%; padding: 0px;
overflow: hidden;
}
div.haakblog div.Halamans div.Halaman div.Alas {
padding: 3px 5px;
}
div.haakblog div.NBTs a {
border-left:1px solid #eee;
border-right:1px solid #eee;
border-top:1px solid #eee;
border-boNBTom:0px solid #eee;
float: left;
display: block;
width: 95px;
text-align: center;
vertical-align: middle;
height: 24px;
padding-top: 3px;
text-decoration: none;
font-family: "Arial", Serif;
font-size: 11px;
font-weight: 900;
color: #000000
}
</style>
<form action="haakblog.html" method="get">
<div id="haakblog" class="haakblog">
<div style="width: 300px;" class="NBTs"> <a>Tab 1 Title</a> <a>Tab 2 Title</a> <a>Tab 3 Title</a></div>
<div style="width: 300px; height: 300px;" class="Halamans">
<div class="Halaman">
<div class="Alas">
<br/>
Tab 1 content goes here
</div>
</div>
<div class="Halaman">
<div class="Alas">
<br/>
Tab 2 content goes here
</div>
</div>
<div class="Halaman">
<div class="Alas">
<br/>
Tab 3 content goes here
</div>
</div>
</div>
<small>
<a href="http://www.haakblog.com" rel="dofollow" target="_blank" title="blogger"><img src="https://bitly.com/haakblog" alt="blogger" border="0" style="position: fixed; bottom: 10%; right: 0%;" /></a><a style='margin-left:10px;align:right;' href='http://www.haakblog.com/2013/08/how-to-add-multi-tabbed-widget-for-blogger.html' target='_blank'>Multi Tabbed Widget</a> | <a href='http://www.haakblog.com/' target='_blank'>Blogger</a></small>
</div>
</div></form>
<script type="text/javascript">haakblog_inisial('haakblog');</script>
2. Change Tab 1 title, Tab 2 title, Tab 3 Title as your tabs that you shown.
3. Change Width and Hight as your requirement
4. Tab 1 content goes here, Tab 2 content goes here, Tab 3 content goes here with your widget code as you want to show in multiple tabbed.
Step 5
Click on Save.


ConversionConversion EmoticonEmoticon