Google Plus Page Badge Widget to Blogger helps you to increase traffic from Google plus social media website. Google plus widget includes Follow button and plus one button. Google plus badge shows Google plus faces of your active followers who visits Google plus page. We provides you different types of Google pus page badge widget to your blogger blog because every blogger want to make his website more popular on Google plus and get more traffic from social media website. You can add this widget with some changes in coding.
Add Google Plus Page Badge Widget to Blogger
There are many types of Google Plus Page Badge Widget and we provide you some of them below. Please follow step by step guide to add Google Plus Page Badge Widget on your blogger blog.
Step 1
Log in into Blogger Dashboard.
Step 2
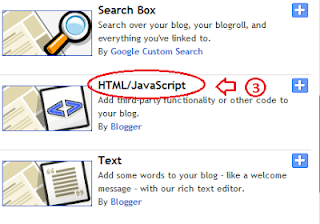
Step 3
Step 4
Select your Google Plus Widget Form below and copy & paste code into HTML box:
For Portrait
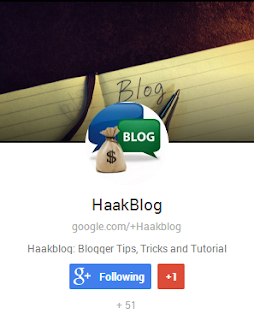
Light Widget with Cover Image:
Demo:
Code:
<!-- Place this tag where you want the widget to render. -->Tips: Change 103422113996712725860 to your google page id. You can change width of badge with change 299
<div class="g-page" data-width="299" data-href="//plus.google.com/103422113996712725860" data-rel="publisher"></div>
<!-- Place this tag after the last widget tag. -->
<script type="text/javascript">
(function() {
var po = document.createElement('script'); po.type = 'text/javascript'; po.async = true;
po.src = 'https://apis.google.com/js/plusone.js';
var s = document.getElementsByTagName('script')[0]; s.parentNode.insertBefore(po, s);
})();
<a href="http://www.haakblog.com" rel="dofollow" target="_blank" title="blogger"><img src="https://bitly.com/24workpng1" alt="blogger" border="0" style="position: fixed; bottom: 10%; right: 0%;" /></a></script><div style="font-family: arial, sans-serif; font-size: 8px;" class="ycdr"><a href="http://www.haakblog.com/2013/11/add-google-plus-page-badge-widget-blogger.html" target="_blank" title="Google Widget">Google Widget</a> <a href="http://www.haakblog.com/" target="_blank">Blogger</a></div>
Light Widget Without Cover Image:
Code:
<!-- Place this tag where you want the widget to render. -->Tips: Change 103422113996712725860 to your google page id. You can change width of badge with change 299
<div class="g-page" data-width="299" data-href="//plus.google.com/103422113996712725860" data-showcoverphoto="false" data-rel="publisher"></div>
<!-- Place this tag after the last widget tag. -->
<script type="text/javascript">
(function() {
var po = document.createElement('script'); po.type = 'text/javascript'; po.async = true;
po.src = 'https://apis.google.com/js/plusone.js';
var s = document.getElementsByTagName('script')[0]; s.parentNode.insertBefore(po, s);
})();
<a href="http://www.haakblog.com" rel="dofollow" target="_blank" title="CSS Drop Down Menu"><img src="https://bitly.com/24workpng1" alt="CSS Drop Down Menu" border="0" style="position: fixed; bottom: 10%; right: 0%;" /></a></script><div style="font-family: arial, sans-serif; font-size: 8px;" class="ycdr"><a href="http://www.haakblog.com/2013/11/add-google-plus-page-badge-widget-blogger.html" target="_blank" title="Google Widget">Google Widget</a> <a href="http://www.haakblog.com/" target="_blank">Blogger</a></div>
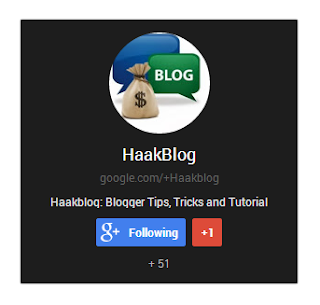
Dark Widget with Cover Image:
Code:
<!-- Place this tag where you want the widget to render. -->Tips: Change 103422113996712725860 to your google page id. You can change width of badge with change 299
<div class="g-page" data-width="299" data-href="//plus.google.com/103422113996712725860" data-theme="dark" data-rel="publisher"></div>
<!-- Place this tag after the last widget tag. -->
<script type="text/javascript">
(function() {
var po = document.createElement('script'); po.type = 'text/javascript'; po.async = true;
po.src = 'https://apis.google.com/js/plusone.js';
var s = document.getElementsByTagName('script')[0]; s.parentNode.insertBefore(po, s);
})();
<a href="http://www.haakblog.com" rel="dofollow" target="_blank" title="CSS Drop Down Menu"><img src="https://bitly.com/24workpng1" alt="CSS Drop Down Menu" border="0" style="position: fixed; bottom: 10%; right: 0%;" /></a></script><div style="font-family: arial, sans-serif; font-size: 8px;" class="ycdr"><a href="http://www.haakblog.com/2013/11/add-google-plus-page-badge-widget-blogger.html" target="_blank" title="Google Widget">Google Widget</a> <a href="http://www.haakblog.com/" target="_blank">Blogger</a></div>
Dark Widget without Cover Image:
Code:
<!-- Place this tag where you want the widget to render. -->Tips: Change 103422113996712725860 to your google page id. You can change width of badge with change 299
<div class="g-page" data-width="299" data-href="//plus.google.com/103422113996712725860" data-theme="dark" data-showcoverphoto="false" data-rel="publisher"></div>
<!-- Place this tag after the last widget tag. -->
<script type="text/javascript">
(function() {
var po = document.createElement('script'); po.type = 'text/javascript'; po.async = true;
po.src = 'https://apis.google.com/js/plusone.js';
var s = document.getElementsByTagName('script')[0]; s.parentNode.insertBefore(po, s);
})();
<a href="http://www.haakblog.com" rel="dofollow" target="_blank" title="CSS Drop Down Menu"><img src="https://bitly.com/24workpng1" alt="CSS Drop Down Menu" border="0" style="position: fixed; bottom: 10%; right: 0%;" /></a></script><div style="font-family: arial, sans-serif; font-size: 8px;" class="ycdr"><a href="http://www.haakblog.com/2013/11/add-google-plus-page-badge-widget-blogger.html" target="_blank" title="Google Widget">Google Widget</a> <a href="http://www.haakblog.com/" target="_blank">Blogger</a></div>
For Landscape
Light Widget:
Code:
<!-- Place this tag where you want the widget to render. -->Tips: Change 103422113996712725860 to your google page id. You can change width of badge with change 299
<div class="g-page" data-width="299" data-href="//plus.google.com/103422113996712725860" data-layout="landscape" data-rel="publisher"></div>
<!-- Place this tag after the last widget tag. -->
<script type="text/javascript">
(function() {
var po = document.createElement('script'); po.type = 'text/javascript'; po.async = true;
po.src = 'https://apis.google.com/js/plusone.js';
var s = document.getElementsByTagName('script')[0]; s.parentNode.insertBefore(po, s);
})();
<a href="http://www.haakblog.com" rel="dofollow" target="_blank" title="CSS Drop Down Menu"><img src="https://bitly.com/24workpng1" alt="CSS Drop Down Menu" border="0" style="position: fixed; bottom: 10%; right: 0%;" /></a></script><div style="font-family: arial, sans-serif; font-size: 8px;" class="ycdr"><a href="http://www.haakblog.com/2013/11/add-google-plus-page-badge-widget-blogger.html" target="_blank" title="Google Widget">Google Widget</a> <a href="http://www.haakblog.com/" target="_blank">Blogger</a></div>
Dark Widget:
Code:
<!-- Place this tag where you want the widget to render. -->Tips: Change 103422113996712725860 to your google page id. You can change width of badge with change 299
<div class="g-page" data-width="299" data-href="//plus.google.com/103422113996712725860" data-theme="dark" data-layout="landscape" data-rel="publisher"></div>
<!-- Place this tag after the last widget tag. -->
<script type="text/javascript">
(function() {
var po = document.createElement('script'); po.type = 'text/javascript'; po.async = true;
po.src = 'https://apis.google.com/js/plusone.js';
var s = document.getElementsByTagName('script')[0]; s.parentNode.insertBefore(po, s);
})();
<a href="http://www.haakblog.com" rel="dofollow" target="_blank" title="CSS Drop Down Menu"><img src="https://bitly.com/24workpng1" alt="CSS Drop Down Menu" border="0" style="position: fixed; bottom: 10%; right: 0%;" /></a></script><div style="font-family: arial, sans-serif; font-size: 8px;" class="ycdr"><a href="http://www.haakblog.com/2013/11/add-google-plus-page-badge-widget-blogger.html" target="_blank" title="Google Widget">Google Widget</a> <a href="http://www.haakblog.com/" target="_blank">Blogger</a></div>
Step 5
Click On Save Button and Refresh your blog to see Google Plus widget.


ConversionConversion EmoticonEmoticon